I needed to compile drivers for the Raspberry Pi Edimax AC450 EW-7711ULC Nano USB WiFi Adapter that I picked up for less than $20 at Amazon to bring 5GHz connectivity to both my RPi2 & RPi3B.
OF COURSE I check the officially supported devices list after I bought them, only to find these specific adapters weren’t on the list, so basically I was on my own.
After doing a few days of research, I determined this wasn’t going to be easy, but in theory it should be possible.
*** Updated 09/23/2017 *** Added section WiFi configs necessary to get connected easily
*** Updated 11/21/2016 *** Added section Building the new module prior to rebooting into a new kernel update
Starting off with the RPi2
Perform a full update. Install packages required for the build process. Then run rpi-update to bring in the most recent firmware updates, followed by a reboot if it finishes without errors.
|
1 2 3 4 5 6 |
root at rpi in ~ # apt-get -y update && apt-get -y dist-upgrade root at rpi in ~ # apt-get install gcc make git bc wpasupplicant wireless-tools root at rpi in ~ # rpi-update |
I’ve plugged in the Edimax adapter and it shows up on the USB bus: vendor ID 7392 device ID a711 (so you know this is exactly the same device as the one you’re trying to get working).
|
1 2 3 4 5 6 |
root at rpi in ~ # lsusb Bus 001 Device 004: ID 7392:a711 Edimax Technology Co., Ltd Bus 001 Device 003: ID 0424:ec00 Standard Microsystems Corp. SMSC9512/9514 Fast Ethernet Adapter Bus 001 Device 002: ID 0424:9514 Standard Microsystems Corp. Bus 001 Device 001: ID 1d6b:0002 Linux Foundation 2.0 roothub |
WiFi configs necessary to get connected easily
These are the configs that have been working well for me, keeping the RPi3 well-connected to the Asus/DD-WRT for a long time, so thought I would post them here because it could be possible to waste many hours as you’re trying to get everything dialed in just right.
Add the new config to the bottom of the network interfaces file. Make sure to change the WiFi settings to fit your needs.
It’s also important to note, anywhere you need to enter the key, it’s not the plain text version of the passphrase, it’s actually a big long string of hex.
To get your hex passphrase:
|
1 2 3 4 5 6 7 |
root at rpi in ~ # wpa_passphrase myssid mysecretpassphrase network={ ssid="myssid" #psk="mysecretpassphrase" psk=22275864700b5fc705f91d547cd5c193fa9c96bc4704628ec1818f7cdbee405c } |
Now add the network block to your wpa_supplicant.conf with a few extra lines shown below.
|
1 2 3 4 5 6 7 8 9 10 11 12 |
ctrl_interface=DIR=/var/run/wpa_supplicant GROUP=netdev update_config=1 network={ ssid="myssid" key_mgmt=WPA-PSK proto=WPA2 pairwise=CCMP TKIP group=CCMP TKIP auth_alg=OPEN psk=22275864700b5fc705f91d547cd5c193fa9c96bc4704628ec1818f7cdbee405c } |
And the interfaces file only needs a few quick edits:
|
1 2 3 4 |
allow-hotplug ra0 iface ra0 inet dhcp wpa-ssid "myssid" wpa-psk "22275864700b5fc705f91d547cd5c193fa9c96bc4704628ec1818f7cdbee405c" |
There is one more place to add configuration, but it doesn’t just exist yet.
Kernel Headers
Now we need to get the linux kernel ready to build a module against it.
To do this, you have three options.
Option 1: Install a package with apt
|
1 2 |
root at rpi in ~ # apt-get install raspberrypi-kernel-headers |
If that completes successfully, great! You can now skip straight to driver compilation section.
If not, you still have another fairly easy option.
Option 2: Manually download & install a pre-built package
Based on the version of kernel that you’re running or upgrading to, Raspbian (jessie) doesn’t always provide an equivalent package for the same version of kernel headers, which are imperative for a successful build process. This could potentially send you on an endless pursuit for a kernel headers package which don’t exist.
Thankfully, Dewey Williams has commented with a link where you should be able to find almost any version of kernel headers that you need, specifically for the RPi.
|
1 2 |
root at rpi in ~ # dpkg -i linux-headers-4.9.51-v7+_4.9.51-v7+-2_armhf.deb |
And if that doesn’t work for you, then you’ll have to create your own custom kernel headers package manually.
Option 3: Roll your own custom kernel headers
|
1 2 3 4 5 6 |
root at rpi in ~ # cd /usr/src root at rpi in /usr/src # git clone --depth 1 https://github.com/raspberrypi/linux.git root at rpi in /usr/src # ln -s /usr/src/linux /lib/modules/`uname -r`/build |
Now import the previous kernel config and run make oldconfig.
|
1 2 3 4 5 6 7 8 |
root at rpi in /usr/src # cd linux root at rpi in /usr/src/linux # modprobe configs root at rpi in /usr/src/linux # zcat /proc/config.gz > .config root at rpi in /usr/src/linux # make oldconfig |
Prep the kernel with these two commands.
|
1 2 |
root at rpi in /usr/src/linux # make prepare && make modules_prepare |
Grab this symbols file and then the kernel is ready to go.
|
1 2 3 4 |
root at rpi in /usr/src/linux # wget https://raw.githubusercontent.com/raspberrypi/firmware/master/extra/Module.symvers root at rpi in /usr/src/linux # cp Module.symvers /lib/modules/`uname -r`/Module.symvers |
In case this doesn’t work for you the first time around, you can reset the kernel back to a fresh state by running these commands.
|
1 2 |
root at rpi in /usr/src/linux # make clean && make mrproper |
Don’t forget that your .config and the Module.symvers will have been wiped out, and you’ll need to reload your config again.
The WiFi Driver
You can download the driver source from Edimax or get the file directly from their site).
|
1 2 3 4 5 6 7 8 9 10 11 12 13 14 15 16 |
root at rpi in /usr/src/linux # cd ~ root at rpi in ~ # wget http://www.edimax.com/edimax/mw/cufiles/files/download/Driver_Utility/EW-7711ULC_Linux_driver_v1.1.zip root at rpi in ~ # unzip EW-7711ULC_Linux_driver_v1.1.zip root at rpi in ~ # cd EW-7711ULC_Linux_driver_v1.1/ root at rpi in ~/EW-7711ULC_Linux_driver_v1.1 # bunzip2 mt7610u.tar.bz2 root at rpi in ~/EW-7711ULC_Linux_driver_v1.1 # tar xvf mt7610u.tar root at rpi in ~/EW-7711ULC_Linux_driver_v1.1 # mv mt7610u_wifi_sta_v3002_dpo_20130916/ .. root at rpi in ~/EW-7711ULC_Linux_driver_v1.1 # cd ~ |
Next get this patch bundle (updated 9/23/2017) from Github and run the script.
|
1 2 3 4 5 6 7 8 |
root at rpi in ~ # git clone https://gist.github.com/benperove/0705726b7c38082c50aa118f4675addc gist root at rpi in ~ # cd gist root at rpi in ~/gist # chmod +x patch.sh root at rpi in ~/gist # ./patch.sh |
You should be ready now for a clean build process.
|
1 2 3 4 5 6 |
root at rpi in ~ # cd mt7610u_wifi_sta_v3002_dpo_20130916/ root at rpi in ~/mt7610u_wifi_sta_v3002_dpo_20130916 # make root at rpi in ~/mt7610u_wifi_sta_v3002_dpo_20130916 # make install |
Compile time on the RPi 2 took 21:15. You’ll probably see quite a few warnings throughout, but if everything finishes without errors, you should be good to go.
|
1 2 |
root at rpi in ~/mt7610u_wifi_sta_v3002_dpo_20130916 # modprobe mt7650u_sta |
Building a new WiFi module prior to rebooting into a new kernel update
If apt-get has downloaded & installed a new kernel, you can safely & easily recompile another module for the new kernel before rebooting the RPi. Otherwise everything will be broken when it boots into the new kernel.
Modify the Makefile and hard code the newly installed version (check /usr/src for the corresponding newly installed linux-headers-x.x.xx). If the headers are missing for the version you need, get the correct kernel header version here.
|
1 2 3 4 5 6 7 8 9 10 |
ifeq ($(PLATFORM),PC) # Linux 2.6 # LINUX_SRC = /lib/modules/$(shell uname -r)/build LINUX_SRC = /lib/modules/4.4.32-v7+/build # Linux 2.4 Change to your local setting #LINUX_SRC = /usr/src/linux-2.4 #LINUX_SRC_MODULE = /lib/modules/$(shell uname -r)/kernel/drivers/net/wireless/ LINUX_SRC_MODULE = /lib/modules/4.4.32-v7+/kernel/drivers/net/wireless/ CROSS_COMPILE = endif |
I’ve commented out the lines with uname (as we’ve yet to boot the new kernel), and added the lines below with the new version. Don’t forget to make sure the paths that you specify here are valid or the build will fail.
After adding the two lines, save & exit.
Run make -j4 and then wait for the build to complete.
Then run make install… don’t be afraid of any errors you see here. The module will be installed to the proper location for the new kernel. You can double check by looking for mt7650u_sta.ko in /lib/modules/x.x.xx-xx-x/kernel/drivers/net/wireless/.
The part that fails during make install is depmod.
Just run it again with the correct version number this time.
|
1 2 |
root at rpi3 in ~/mt7610u_wifi_sta_v3002_dpo_20130916 # /sbin/depmod -a 4.4.32-v7+ |
Almost ready for a reboot, but here’s that final configuration file that needs to be edited.
Make sure to edit /etc/Wireless/RT2870STA/RT2870STA.dat and add your SSID and PSK. Most of the configuration should already be set from when we ran the gist and patched the driver files eariler.
|
1 2 3 4 5 6 7 8 9 |
CountryRegion=5 CountryRegionABand=7 SSID=myssid NetworkType=Infra WirelessMode=12 Channel=0 AuthMode=WPA2PSK EncrypType=AES WPAPSK=22275864700b5fc705f91d547cd5c193fa9c96bc4704628ec1818f7cdbee405c |
Now hold your breath & give it a reboot.
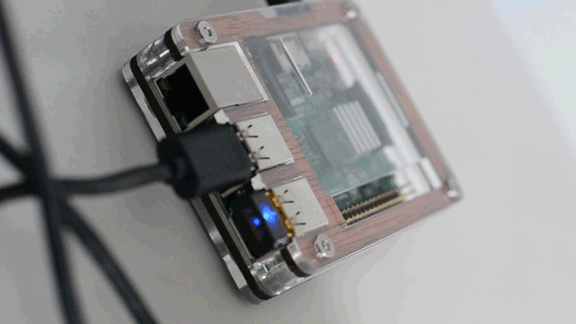
Don’t stress too much though, the blue light came on almost immediately for me and I was once again connected via WiFi with the RPi having booted the new kernel.
Now you should see the blue light on the WiFi adapter, and it should be trying to join to the network using the settings you defined in /etc/network/interfaces.
Verify that everything is working properly with these commands.
|
1 2 3 4 5 6 7 8 9 10 11 |
root at rpi in ~/mt7610u_wifi_sta_v3002_dpo_20130916 # ifup ra0 root at rpi in ~/mt7610u_wifi_sta_v3002_dpo_20130916 # iwconfig ra0 ra0 Ralink STA ESSID:"myssid" Nickname:"MT7610U_STA" Mode:Managed Frequency=5.805 GHz Access Point: 74:D0:2B:42:15:C4 Bit Rate=433.5 Mb/s RTS thr:off Fragment thr:off Link Quality=100/100 Signal level:-35 dBm Noise level:-46 dBm Rx invalid nwid:0 Rx invalid crypt:0 Rx invalid frag:0 Tx excessive retries:0 Invalid misc:0 Missed beacon:0 |
|
1 2 3 4 5 6 7 8 9 10 |
root at rpi in ~/mt7610u_wifi_sta_v3002_dpo_20130916 # ifconfig ra0 ra0 Link encap:Ethernet HWaddr 74:da:38:55:9b:98 inet addr:10.0.5.126 Bcast:10.0.5.255 Mask:255.255.255.0 inet6 addr: fe80::8c41:bb12:65e5:772b/64 Scope:Link UP BROADCAST RUNNING MULTICAST MTU:1500 Metric:1 RX packets:731331 errors:2 dropped:0 overruns:0 frame:0 TX packets:376543 errors:0 dropped:0 overruns:0 carrier:0 collisions:0 txqueuelen:1000 RX bytes:145967478 (139.2 MiB) TX bytes:547695686 (522.3 MiB) |
Follow the exact same procedure for RPi 3B
Compile time for the RPi 3B only took 3:57! So snappy compared to the RPi2. On the most recent kernel update 4.4.26-v7+ (released October 25th, 2017), based on a suggestion provided in a comment by Harold Feit, adding the -j4 parameter to make has reduced the build process on the 3B by 1:31 – that’s 37% faster than running make by itself. Makes perfect sense in order to take full advantage of RPi 3B’s 4 cores. Thanks Harold.
The only thing different that I ran into here, was the final make install didn’t actually install the dat file correctly, so I had to copy it manually.
|
1 2 3 4 5 6 |
root at rpi in ~/mt7610u_wifi_sta_v3002_dpo_20130916 # mkdir -p /etc/Wireless/RT2870STA root at rpi in ~/mt7610u_wifi_sta_v3002_dpo_20130916 # cp conf/RT2870STA.dat /etc/Wireless/RT2870STA root at rpi in ~/mt7610u_wifi_sta_v3002_dpo_20130916 # modprobe mt7650u_sta |
I had a helluva time getting this to work, on two different platforms no less. Hopefully this helps you to compile the driver and get up and running with your WiFi without too much headache.
If you need to start over again in the driver source tree, this command will reset you back to the beginning. (Must’ve done it at least 50 times myself.)
|
1 2 |
root at rpi in ~/mt7610u_wifi_sta_v3002_dpo_20130916 # make clean |
Also, if the driver is compiling successfully, but modprobe complains when you try to load it, you might try installing the kernel headers package and linking them to your modules directory: /lib/modules/4.4.13-v7+/build → /usr/src/linux-headers-4.4.13-v7+/
|
1 2 3 4 5 6 |
root at rpi3 in /usr/src/linux on rpi-4.4.y # unlink /lib/modules/`uname -r`/build root at rpi3 in /usr/src/linux on rpi-4.4.y # apt-get install raspberrypi-kernel-headers root at rpi3 in /usr/src/linux on rpi-4.4.y # ln -s /usr/src/linux-`uname -r` /lib/modules/`uname -r`/build |
Otherwise how’d it go? Did you get it to work? Run into any issues? Share your experience below in the comments.
There are 9 comments